Showing posts with label zakka. Show all posts

Monday, 16 June 2014

Zakka Pdf patterns

I have recently updated and re-designed two zakka patterns for sale on my etsy shop. I'm very happy with the updated graphics and layout here is a sneak peak at what is new.


Tissue Pocket

 This very Cute tissue pocket fits pocket size travel tissues 7 1/2 cm X 11cm...... A great pattern to make gifts or to put in your handbag, babies bag, office or car

Great for a beginner sewer.

Includes
-6 page pattern in PDF format
-List of materials needed
-Full size printable pattern piece just Print and Sew! (No need to enlarge or resize!)
-Photographs that show each step with written instructions
-can be viewed on an ipad or tablet


Size of tissue pocket 12.5cm length 9cm width


 https://www.etsy.com/au/listing/192852427/tissue-pocket-pattern-download-pdf?

little fukuro


 Little Fukuro HOOT HOOT

This listing is to purchase a PDF sewing pattern for making cute little owls. It's a easy and fun pattern great for any beginner sewer. Can be made by sewing by hand or sewing machine.

Includes
-13 page pattern in PDF format
-List of materials needed
-Full size printable pattern pieces just Print and Sew! (No need to enlarge or resize!)
-Photographs that show each step with written instructions
- Can be viewed on ipad or tablet

Finished owl is approximately 7cm high 7cm wide at base


 https://www.etsy.com/au/listing/192754702/little-fukuro-owl-pattern-download-pdf?

Saturday, 4 January 2014

Plum Season

Soooo Many Plums......


Well what a season for my plum tree. After a disaster last year with no plums due to a bad storm which brought with it strong winds and blew off all the flower buds. This season has made up for it with an abundance of plums. Some I have already given to family and friends but I have been busy making plum jam and sauce. I thought I would share with you the recipes I used. 

Plum Jam


1.5kg (3lb 5oz) plums washed and stalks removed 

1 cup water 

Juice of 1 lemon 

1.25kg (2lb 12oz) sugar

Place plums,lemon juice and water into a large pot and bring it to the boil, stir it often. Continue to cook until the plums are well broken down and stir frequently to prevent the mixture from sticking to the bottom. Add the sugar and stir until it has dissolved. Bring mixture back to the boil. Stir it regularly and cook until setting point is reached. Strain the jam using a colander this will remove the pips but let the jam run through. Pour into warm sterilised jars and seal immediately. 


Plum Sauce


3kg (6 lb 12 oz) plums washed and storks removed

1.5kg (3 lb 5 oz) sugar

6 cups apple cider vinegar

500g (1 lb 2 oz)onions peeled and chopped

6 garlic cloves, peeled and chopped

3 teaspoons salt

1 tablespoon grated ginger

3 teaspoons allspice

2 teaspoons ground cloves

1 teaspoon cinnamon

1 teaspoon cayenne pepper

1 teaspoon mustard powder

juice of 1 lemon


Place all of the ingredients into a very large pot and stir over a medium heat until the sugar has dissolved. Once it is boiling continue to boil for 2 hours until the mixture is thick.
Strain through a course sieve or colander to remove pips. Pour into sterilised bottles or jars and seal immediately. Can be stored in a cool, dry dark place for up to 2 years
 

Little Fukuro Owl Pattern- Download PDF on Etsy

Little Fukuro HOOT HOOT

This listing is to purchase a PDF sewing pattern for making cute little owls. It's a easy and fun pattern great for any beginner sewer. Can be made by sewing by hand or sewing machine.

Includes
-13 page pattern in PDF format
-List of materials needed
-Full size printable pattern pieces just Print and Sew! (No need to enlarge or resize!)
-Photographs that show each step with written instructions

Finished owl is approximately 7cm high 7cm wide at base
Can be purchase from my Etsy shop:

Thursday, 29 November 2012

Strawberry Patch Haul

Summer is here.......well officially in 1 day
Today is 38 degrees the first hot day in a long time. I got up early this morning to water the garden and to pick all the ripe strawberries. A few big ones where sadly eaten by some snails but oh well I don't mind sharing. Now what to make, a smoothie or just to eat them as they are mmmmm maybe both...... 


This picture was taken on the 4th  of September just after putting down the sugar cane mulch in preparation for the fruit so it doesn't rot when it hits the dirt.


 This photo was taken today in the same spot it has grown so much soon I will be harvesting peaches cant wait until that day......


Sunday, 5 August 2012

Tissue Pocket Tutorial PDF- Etsy

Hi everyone I have just relesed for purchase my tissue pocket PDF Pattern and tutorial on Etsy.
This very Cute tissue pocket fits pocket size travel tissues 7 1/2 cm X 11cm...... A great pattern to make gifts or to put in your handbag, babies bag, office or car

This pattern includes step by step tutorial and photographs on how to make your very own Tissue Pocket.
Great for a beginner sewer.

Includes printable pattern to cut out and use.

Size of tissue pocket 12.5cm length 9cm width


For more information please visit:
https://www.etsy.com/listing/104895087/tissue-pocket-pdf-pattern


Monday, 26 March 2012

How to fix a broken Sizzix


 OH NO my sizzix broke !!!

I went to use my sizzix today and the handle turns but then jams and gets stuck noooo.....
I looked to see if something was stuck in the rollers but I couldn't find anything, so I thought I better pull it apart and see what the problem is. So this is a tutorial on how to safely pull apart your sizzix and fix it. 

Tools
Allen key
Phillips head screwdriver
Sewing machine oil
Small brush


 Step 1
 Remove the black cap off the handle end
Step 2
Using the right size allen key undo the screw and 
slide the handle off
  Step 3
Using the Phillips head screwdriver undo the screw shown by the arrows
Step 4
Once all the screw are taken off you will need to use some force to take off the black sides. They are clipped in but with some patience they will come apart.

 Step 5
Next is to take off the middle handle and then the plates either side these will come apart easy.
 All the parts should ow be off the main metal rollers.

Step 6
Next is to brush out any fluff in the rollers mine had a bit because it gets a workout with felt...
Take off the top small cog by pulling off the plastic stopper and then the cog.
Step 7
Now this is where my skateboarding days come in handy....underneath the cogs there are bearings very similar to the ones used in skateboarding wheels and if the get dirt and dust in them they tend not to move or get stuck. 
So to fix this put some sewing machine oil or any machine oil you have and put it on the bearings.

Step 8
Put the small cog and stopper back on... next slide the cranking handle on and give it a few turns all the cogs should move and this will send the oil into the bearings to lubricate them...After a few turns everything should be moving smoothly

Now to put it all back together
Just go backwards on the way you pulled it apart
Plates on first
Top carrying handle
Clip on sides and screw back in
Put cranking handle on
Use allen key to put back screw for cranking handle
Then place the black cap back

You should now have a fully serviced and function sizzix again
I hope this has helped anyone who has a broken sizzix and need to fix it

Happy crafting!!!!

Sunday, 4 December 2011

Make It - Deco Tape Ideas

...........I love using deco tape to decorate items in my craft studio here are just a few things I have made......

I have purchased most of my deco tapes from diaso I love this shop everything is $2.80AUD so here a a few pics of my recent purchases...

This tape has cats, bird cages, balloons, balls of yarn
and arm chairs on it a real cute french theme
This one is a lace tape with love heart and flower cut outs this one tends to go a bit see through so not so good for putting on dark colours
Japanese fabric tape I might use this one for some book binding great to put down the spine of your books before binding

 Japanese cheery blossom paper tape, this one can be torn and you can use punch stamps to make your own stickers 

Here I have used the lace deco tape around a coffee jar
Around a tea light glass holder

 and around a wood pencil


Make It- Kawaii Wooden Ruler

This is a very quick tutorial on how to make a plain wooden ruler into a very cute ruler......

Materials
- Wooden Ruler
- Fabric Glue
- Ribbon/lace
- Nail polish remover (only if your ribbon is see through)


Step 1 

Cut your ribbon to the length of your ruler


Step 2

 If your ruler has any text or brand on it and you are using ribbon or lace that you can see through do this step..... Using nail polish remover (I used the wipes) rub off the text/brand this might take some rubbing... you could also use some sand paper to rub it back....
Step 3

Put some fabric glue down the length of your ruler then
stick down the ribbon clean up any glue that comes out the sides....let it dry and now you have a cute ruler to add
to your stationary collection

Friday, 7 October 2011

Zakka Craft Bill Pocket File

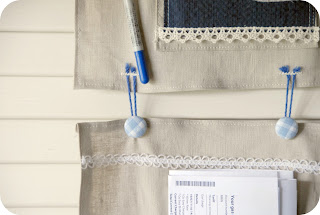
This is one of my latest creations......a bill file pocket for my pantry door.....
The top pocket is for bills to be paid and a little pen and holder....the bottom pocket is for bills that have been paid and a little hanger with pegs to stick things like stamps and other items
 It is made from scrap fabric and Japanese handkerchief linen


Sunday, 18 September 2011

My Latest Magazine Collection

Yay....... My package came from Japan and I have some great new books and magazines.

Soooo excited when it came, a new Cotton Time and Cotton Friend ... Also got two other zakka books one on making bags and bento box  lunch bags......the other is a book by the makers of Cotton Time and has loads of zakka crafts: bags, tissue holders, purses, hair ties, head bands, baby's bibs, key chains, stationary items and heaps more so happy with this purchase a must for any collector.....


I have also just acquired  these two magazines from the UK Mollie Makes........ I was able to purchase these at my local newsagent. These are great...... full of craft ideas for the home and very cute things to make like felt mascots....

Thursday, 21 July 2011

What Have I been Making

I've been  very busy making brooches and taking photos of them for a product catalog I'm putting together....
I have finally put together my pop up light box to take photos. 
Ponyo and Suki  (my cats) think its a really cool new cat play house and they are starting to put little claw pin holes in the fabric arrrrgggghhhh......

Tuesday, 28 June 2011

Make It- Sew On Labels


I have been wanting to post this for awhile now and finally can. I changed the design of my label and thought i would do a tutorial as I made them. Why pay to get your labels made when you can easily make them yourself....

Items Needed

* Linen Tape ( I used 2cm Tape)
* Printer transfer T-shirt Paper ( I used Epsom brand)
* Scissors
* Iron
* Computer program like publisher or photo-shop

I used publisher to create my label.
I went into page setup and changed the page layout size to custom and made the dimensions 2cm X 5cm.

I also change the copies per sheet so I ended up with 45 labels on a A4 size paper.

I used word art to make my text ....This is so you can flip your text horizontal 

*Remember text must be in a mirror image*

To flip text go select text and go to arrange in the menu bar go down to flip or rotate and then click flip horizontal now your text should be a mirror image.

Make any design you like then you can print it.  I changed my printer settings to best photo to get the greatest result....


Once it has printed out give it time to dry... then you can start ironing...


Cut out the label from the transfer paper and cut linen tape to size make sure the tape is fluff free and clean you don't want fluff pressed under your transfer.....
Set you iron on a low setting and have the steam function off... Start to iron the transfer onto the tape make sure you go right to the edges keep moving the iron around so you don't burn the transfer paper...
Let the label cool then you can peel the paper back off and WOW you have just made you own designed label......


......Happy making....