Hi everyone I have just relesed for purchase my tissue pocket PDF Pattern and tutorial on Etsy.
This very Cute tissue pocket fits pocket size travel tissues 7 1/2 cm X
11cm...... A great pattern to make gifts or to put in your handbag,
babies bag, office or car
This pattern includes step by step tutorial and photographs on how to make your very own Tissue Pocket.
Great for a beginner sewer.
Includes printable pattern to cut out and use.
Size of tissue pocket 12.5cm length 9cm width
For more information please visit:
https://www.etsy.com/listing/104895087/tissue-pocket-pdf-pattern
Sunday, 5 August 2012
Monday, 26 March 2012
How to fix a broken Sizzix
OH NO my sizzix broke !!!
I went to use my sizzix today and the handle turns but then jams and gets stuck noooo.....
I looked to see if something was stuck in the rollers but I couldn't find anything, so I thought I better pull it apart and see what the problem is. So this is a tutorial on how to safely pull apart your sizzix and fix it.
Tools
Allen key
Phillips head screwdriver
Sewing machine oil
Small brush
Step 1
Remove the black cap off the handle end
Step 2
Using the right size allen key undo the screw and
slide the handle off
Step 3
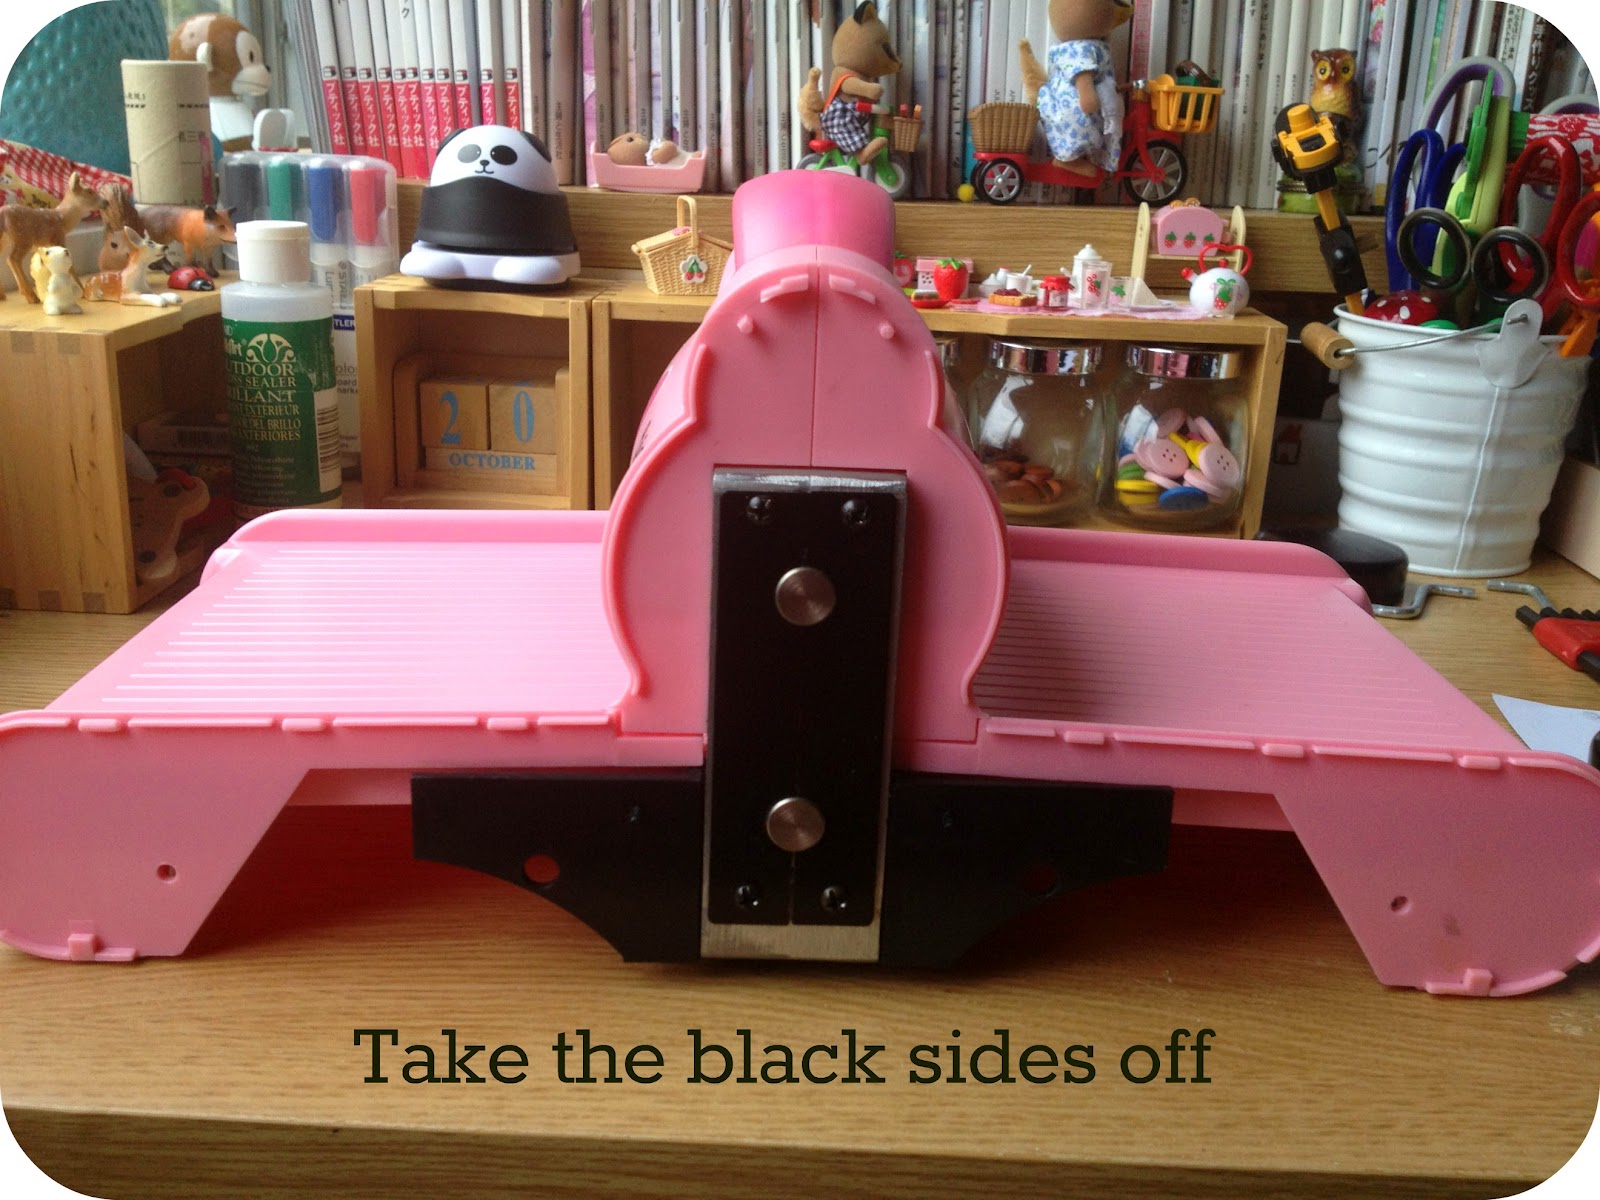
Using the Phillips head screwdriver undo the screw shown by the arrows
Step 4
Once all the screw are taken off you will need to use some force to take off the black sides. They are clipped in but with some patience they will come apart.
Step 5
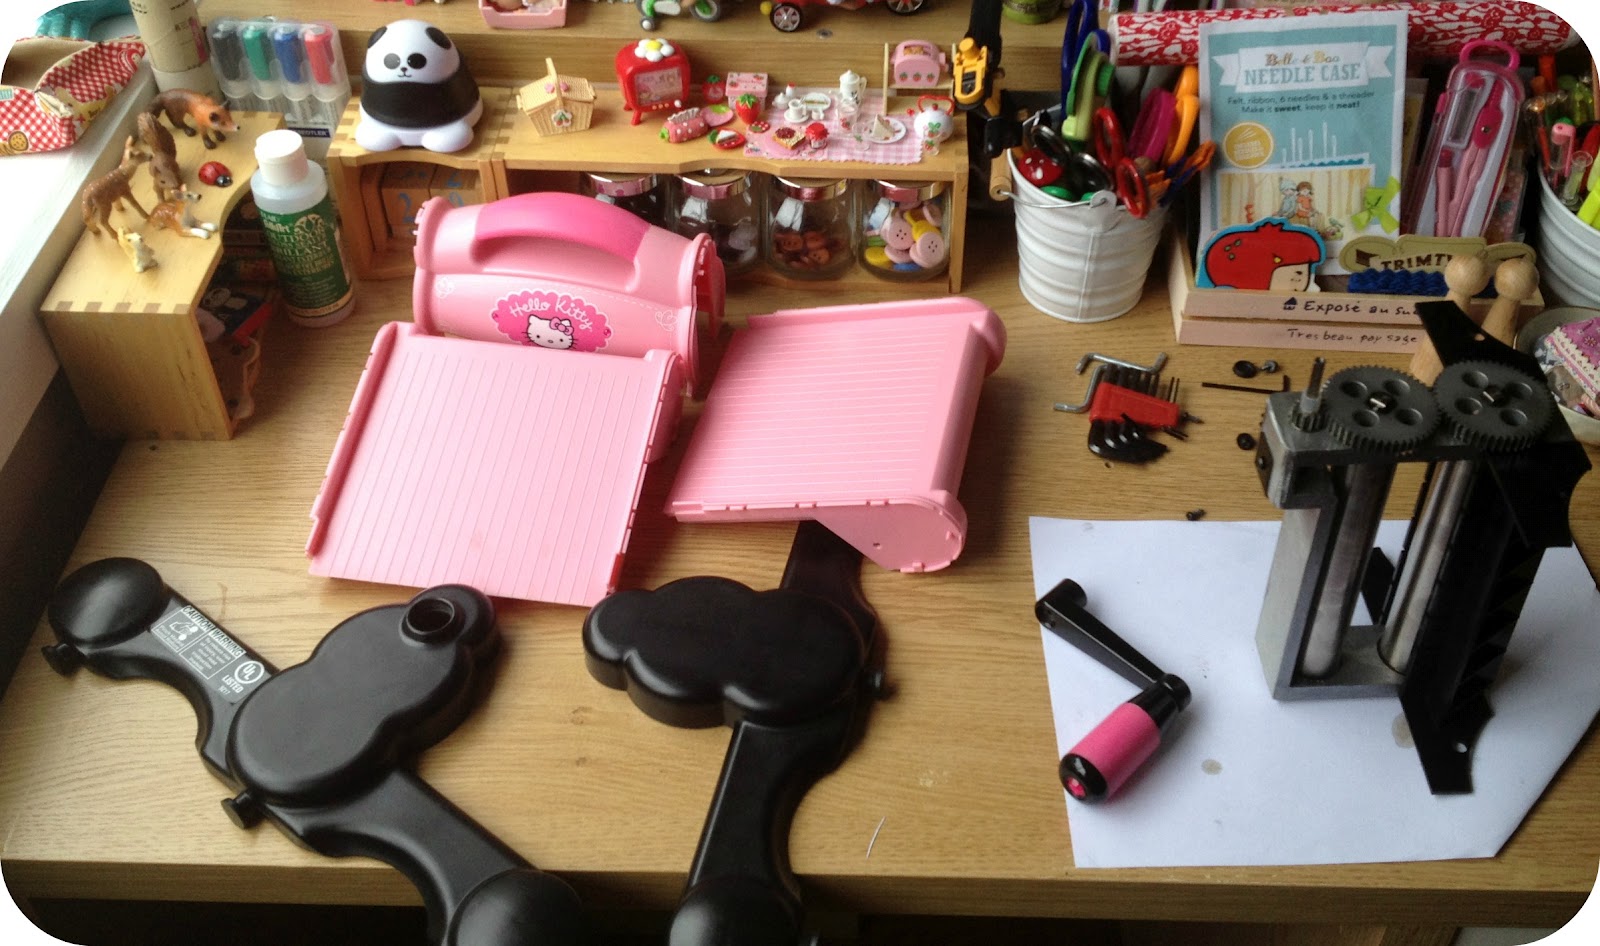
Next is to take off the middle handle and then the plates either side these will come apart easy.
All the parts should ow be off the main metal rollers.
Step 6
Next is to brush out any fluff in the rollers mine had a bit because it gets a workout with felt...
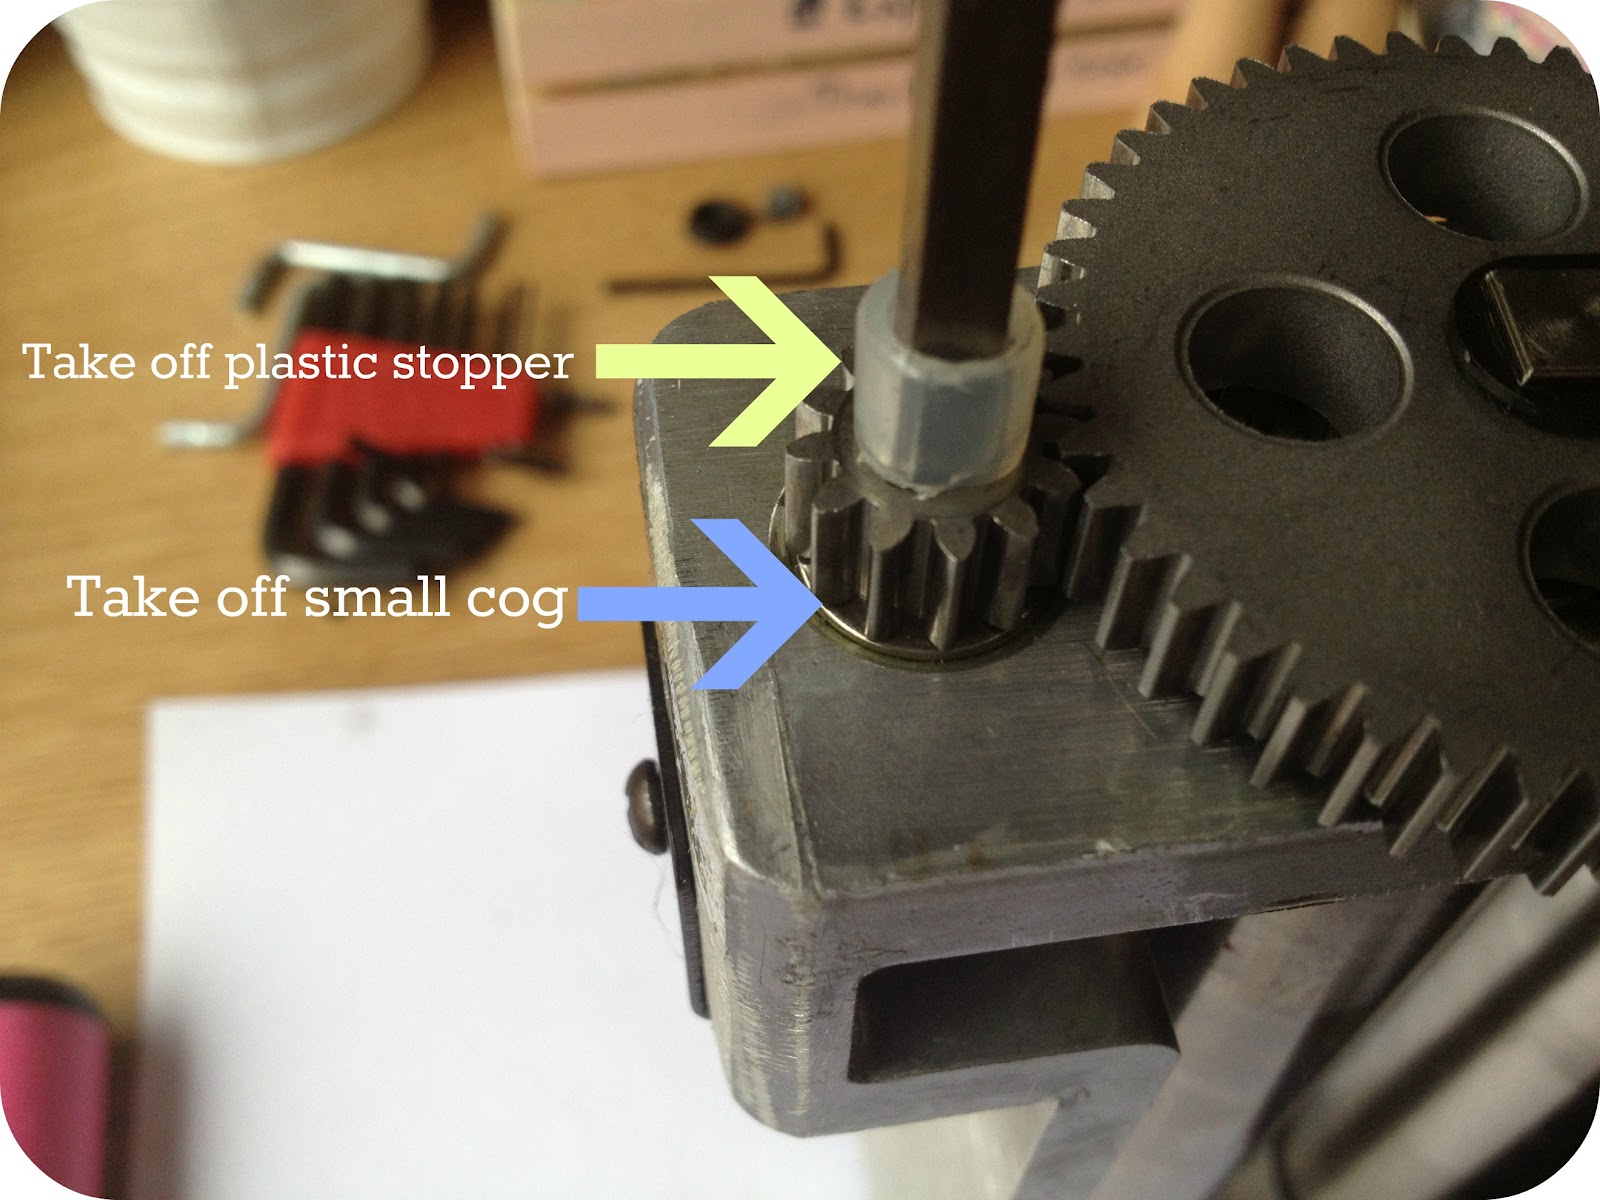
Take off the top small cog by pulling off the plastic stopper and then the cog.
Step 7
Now this is where my skateboarding days come in handy....underneath the cogs there are bearings very similar to the ones used in skateboarding wheels and if the get dirt and dust in them they tend not to move or get stuck.
So to fix this put some sewing machine oil or any machine oil you have and put it on the bearings.
Step 8
Put the small cog and stopper back on... next slide the cranking handle on and give it a few turns all the cogs should move and this will send the oil into the bearings to lubricate them...After a few turns everything should be moving smoothly
Now to put it all back together
Just go backwards on the way you pulled it apart
Plates on first
Top carrying handle
Clip on sides and screw back in
Put cranking handle on
Use allen key to put back screw for cranking handle
Then place the black cap back
You should now have a fully serviced and function sizzix again
I hope this has helped anyone who has a broken sizzix and need to fix it
Happy crafting!!!!
Wednesday, 14 March 2012
All in a afternoon- Restoring old draws
I have had this set of draws in my shed for a couple of years now.
I had decorated it 10 years ago in a shabby chic style. I thought it's time to get it's old original charm back....
I tried sanding it back by hand and using a scraper but a layer of black paint and white paint was hard to get through.... So bring on the paint stripper!
Once it was covered in paint stripper it was so exciting to watch it bubble and
blister. Then the fun part came scraping it off. Oh and a warning I had gloves on but I got some paint
on my arms and boy does it burn I washed it off straight away and was fine after that......so all in an afternoon the end result was pretty good.....
Monday, 20 February 2012
-Letter From Japan-
My first letter from Natsuko my snail mail pen friend came today much to my excitement.... I think I stared at the envelope for about 2 minutes before I even opened it.... WOW I was soooo anxious to see what was inside...
Soo excited as I was opening it I had my legs curled up underneath myself while sitting on the couch and tearing at the sticky tape and turning it upside down on my lap until all the contents came out. I didn't know what to look at first but I knew I had to read the letter first its just a rule you have to abide by, just like when you get a birthday present you open the card first before the present...
After reading Natsuko's letter it filled me up with much happiness it's just great to share your life and life's stories with another... Then came the goodies some very yummy chocolate and I must admit it didn't take me long to eat it, some beautiful postcards, cute little sticky memo's and this really amazing magnet that she made it's called "Kimekomi" ....I have seen similar crafts before done on polystyrene balls but this is really great and I would love to try this sometime....
I cant wait to write my reply now and I'm full of inspiration again and to get back to crafting!
Labels:
crafts,
japan,
penfriend,
postcards,
snail mail
Wednesday, 1 February 2012
- Happy New Year-
I'm Back from holidays!!!
I had such a lovely break from work, I spent my time at home and was able to catch up on all the gardening and caught up on loads of movies!!
It's a new year and I'm totally focused on Tokyo Ties and getting myself out there. I have many projects in the making and I will be sharing my ideas and will be posting more tutorials and creations with you.
I spent a bit of my time of on making a few things.... I was mainly making felt brooches and sketching new designs and ideas.....
This is one of the brooches I made a red hooded pixie.....
Sunday, 4 December 2011
Make It - Deco Tape Ideas
...........I love using deco tape to decorate items in my craft studio here are just a few things I have made......
I have purchased most of my deco tapes from diaso I love this shop everything is $2.80AUD so here a a few pics of my recent purchases...
This tape has cats, bird cages, balloons, balls of yarn
and arm chairs on it a real cute french theme
This one is a lace tape with love heart and flower cut outs this one tends to go a bit see through so not so good for putting on dark colours
Japanese fabric tape I might use this one for some book binding great to put down the spine of your books before binding
Japanese cheery blossom paper tape, this one can be torn and you can use punch stamps to make your own stickers
Here I have used the lace deco tape around a coffee jar
Around a tea light glass holder
and around a wood pencil
Make It- Kawaii Wooden Ruler
This is a very quick tutorial on how to make a plain wooden ruler into a very cute ruler......
Materials
- Wooden Ruler
- Fabric Glue
- Ribbon/lace
- Nail polish remover (only if your ribbon is see through)
Step 1
Cut your ribbon to the length of your ruler
Step 2
If your ruler has any text or brand on it and you are using ribbon or lace that you can see through do this step..... Using nail polish remover (I used the wipes) rub off the text/brand this might take some rubbing... you could also use some sand paper to rub it back....
Step 3
Put some fabric glue down the length of your ruler then
stick down the ribbon clean up any glue that comes out the sides....let it dry and now you have a cute ruler to add
to your stationary collection
Labels:
DIY,
kawaii,
kawaii stationary,
make it,
ruler,
staionary,
wooden ruler,
zakka
Subscribe to:
Posts (Atom)


