Saturday, 30 January 2016

My love of penpalling


I have been writing penpal letters for over 5 years now it is a passion on mine. I first started when I was about 13 but not sure what happened lost contact with them. I love being part of the snail mail community I have met such lovely people from all over the world. Mid last year I took on board having more penpals I'm currently up to around 25. It has been so much fun creating letters and sending them all over the world. Here is a look at some of the Letters and flipbooks I have sent in the last few months.


Thursday, 23 July 2015

Choc of the morning to ya


Ingredients 
1 cup coconut milk
1/4 avocado
1/2 frozen banana
Tbs maple syrup
Tbs cocoa
5 fresh mint leaves 

Wednesday, 22 July 2015

Snailmail Revolution

Penpals

I have been taken hostage by the snail mail revolution. I have been pen-paling for about five years now to one penpal. Now that I'm a stay at home mum I have taken on board a challenge of having penpals from all different countries around the world. I love the idea of siting down to some old style letter writing, it's a great getaway from technology. I get to use all the beautiful stationary I have and I like to collect.

Where do I find my penpals? I use Instagram #penpalswanted #penpals I have a dedicated penpal account @penpaltash

 Handmade Stationary using stamps
 Postcard purchase ready for new homes
 Mega Stationary shop so much cute

Australian Stamps waiting for their big trip Over seas 


Green Apple Pie Smoothie

Green Apple Pie Smoothie
Ingredients 
1 frozen banana
2 peeled chopped green apples
1/4 of a ripe avocado
1 cup low fat milk
1 tbs coconut oil
1 tsp vanilla
1 tbs maple syrup
1/2 tsp cinnamon
   

Thursday, 9 July 2015

Back Into Action

Well hello everyone after being out of action for the last 12 months I'm now back!!!
What has happened, well I was busy looking after a toddler and pregnant with my second child. Corben was born in October and eight months has already past I have been very busy juggling the both of them as they have been very time consuming, with only 17 months between them. I'm hoping I will be spending my free time crafting, creating, gardening, and of course baby and toddler food cooking.
 Below are some of my latest creations which are now listed on www.tokyoties.com 


Monday, 16 June 2014

Zakka Pdf patterns

I have recently updated and re-designed two zakka patterns for sale on my etsy shop. I'm very happy with the updated graphics and layout here is a sneak peak at what is new.


Tissue Pocket

 This very Cute tissue pocket fits pocket size travel tissues 7 1/2 cm X 11cm...... A great pattern to make gifts or to put in your handbag, babies bag, office or car

Great for a beginner sewer.

Includes
-6 page pattern in PDF format
-List of materials needed
-Full size printable pattern piece just Print and Sew! (No need to enlarge or resize!)
-Photographs that show each step with written instructions
-can be viewed on an ipad or tablet


Size of tissue pocket 12.5cm length 9cm width


 https://www.etsy.com/au/listing/192852427/tissue-pocket-pattern-download-pdf?

little fukuro


 Little Fukuro HOOT HOOT

This listing is to purchase a PDF sewing pattern for making cute little owls. It's a easy and fun pattern great for any beginner sewer. Can be made by sewing by hand or sewing machine.

Includes
-13 page pattern in PDF format
-List of materials needed
-Full size printable pattern pieces just Print and Sew! (No need to enlarge or resize!)
-Photographs that show each step with written instructions
- Can be viewed on ipad or tablet

Finished owl is approximately 7cm high 7cm wide at base


 https://www.etsy.com/au/listing/192754702/little-fukuro-owl-pattern-download-pdf?

Friday, 16 May 2014

Autumn Inspiration

It's May already time seems to go so quickly these days. My son Felix is now one and another on the way due in October very exciting times.
To celebrate Felix's first birthday my husband and I took him to the National Rhododendron Garden in Mt Dandenong for a picnic. It was a beautiful autumn day with lots of colour exploding all around us.
I haven't picked up my Nikon camera in such a long time opting for the easy iPhone to take most of my photos and it was great to hold it again and to take some amazing photos to be proud of. It reminded me of a talent and passion I have that has been lost for awhile now and it was great to get inspired and back into it.
I took many photographs but here are some of the special ones.


Saturday, 4 January 2014

Plum Season

Soooo Many Plums......


Well what a season for my plum tree. After a disaster last year with no plums due to a bad storm which brought with it strong winds and blew off all the flower buds. This season has made up for it with an abundance of plums. Some I have already given to family and friends but I have been busy making plum jam and sauce. I thought I would share with you the recipes I used. 

Plum Jam


1.5kg (3lb 5oz) plums washed and stalks removed 

1 cup water 

Juice of 1 lemon 

1.25kg (2lb 12oz) sugar

Place plums,lemon juice and water into a large pot and bring it to the boil, stir it often. Continue to cook until the plums are well broken down and stir frequently to prevent the mixture from sticking to the bottom. Add the sugar and stir until it has dissolved. Bring mixture back to the boil. Stir it regularly and cook until setting point is reached. Strain the jam using a colander this will remove the pips but let the jam run through. Pour into warm sterilised jars and seal immediately. 


Plum Sauce


3kg (6 lb 12 oz) plums washed and storks removed

1.5kg (3 lb 5 oz) sugar

6 cups apple cider vinegar

500g (1 lb 2 oz)onions peeled and chopped

6 garlic cloves, peeled and chopped

3 teaspoons salt

1 tablespoon grated ginger

3 teaspoons allspice

2 teaspoons ground cloves

1 teaspoon cinnamon

1 teaspoon cayenne pepper

1 teaspoon mustard powder

juice of 1 lemon


Place all of the ingredients into a very large pot and stir over a medium heat until the sugar has dissolved. Once it is boiling continue to boil for 2 hours until the mixture is thick.
Strain through a course sieve or colander to remove pips. Pour into sterilised bottles or jars and seal immediately. Can be stored in a cool, dry dark place for up to 2 years
 

Little Fukuro Owl Pattern- Download PDF on Etsy

Little Fukuro HOOT HOOT

This listing is to purchase a PDF sewing pattern for making cute little owls. It's a easy and fun pattern great for any beginner sewer. Can be made by sewing by hand or sewing machine.

Includes
-13 page pattern in PDF format
-List of materials needed
-Full size printable pattern pieces just Print and Sew! (No need to enlarge or resize!)
-Photographs that show each step with written instructions

Finished owl is approximately 7cm high 7cm wide at base
Can be purchase from my Etsy shop:

Monday, 25 March 2013

Make Your Own Koinobori Bunting

Make Your Own Koinobori Bunting

I have been busy making things to decorate the baby nursery. I was inspired to make this from a koinobori (Carp streamer/ wind sock) I got while in Japan I thought it would make a cute felt bunting.

I first made the pattern pieces the body shape, mouth, scales and eye. These were basic to draw I then cut them out and used them as templates on my felt. The mouth piece I stitched by hand and the other pieces I used fabric glue. I used brown wool as the rope. A simple little project that can be made in an afternoon HAPPY CRAFTING!!!

Saturday, 15 December 2012

1950's made in Japan Ceramics

I would like to share with you all my latest obsession 1950's Japanese ceramics.
My collection is now growing so I thought its time for some pictures. I mostly like collecting cookie jars and planter vases but sometimes a few cute salt and pepper shakers I cant resist.
 
Cookie Jars

 
Planter Vases


Salt and Pepper Shakers


Thursday, 29 November 2012

Strawberry Patch Haul

Summer is here.......well officially in 1 day
Today is 38 degrees the first hot day in a long time. I got up early this morning to water the garden and to pick all the ripe strawberries. A few big ones where sadly eaten by some snails but oh well I don't mind sharing. Now what to make, a smoothie or just to eat them as they are mmmmm maybe both...... 


This picture was taken on the 4th  of September just after putting down the sugar cane mulch in preparation for the fruit so it doesn't rot when it hits the dirt.


 This photo was taken today in the same spot it has grown so much soon I will be harvesting peaches cant wait until that day......


Sunday, 5 August 2012

Tissue Pocket Tutorial PDF- Etsy

Hi everyone I have just relesed for purchase my tissue pocket PDF Pattern and tutorial on Etsy.
This very Cute tissue pocket fits pocket size travel tissues 7 1/2 cm X 11cm...... A great pattern to make gifts or to put in your handbag, babies bag, office or car

This pattern includes step by step tutorial and photographs on how to make your very own Tissue Pocket.
Great for a beginner sewer.

Includes printable pattern to cut out and use.

Size of tissue pocket 12.5cm length 9cm width


For more information please visit:
https://www.etsy.com/listing/104895087/tissue-pocket-pdf-pattern


Monday, 26 March 2012

How to fix a broken Sizzix


 OH NO my sizzix broke !!!

I went to use my sizzix today and the handle turns but then jams and gets stuck noooo.....
I looked to see if something was stuck in the rollers but I couldn't find anything, so I thought I better pull it apart and see what the problem is. So this is a tutorial on how to safely pull apart your sizzix and fix it. 

Tools
Allen key
Phillips head screwdriver
Sewing machine oil
Small brush


 Step 1
 Remove the black cap off the handle end
Step 2
Using the right size allen key undo the screw and 
slide the handle off
  Step 3
Using the Phillips head screwdriver undo the screw shown by the arrows
Step 4
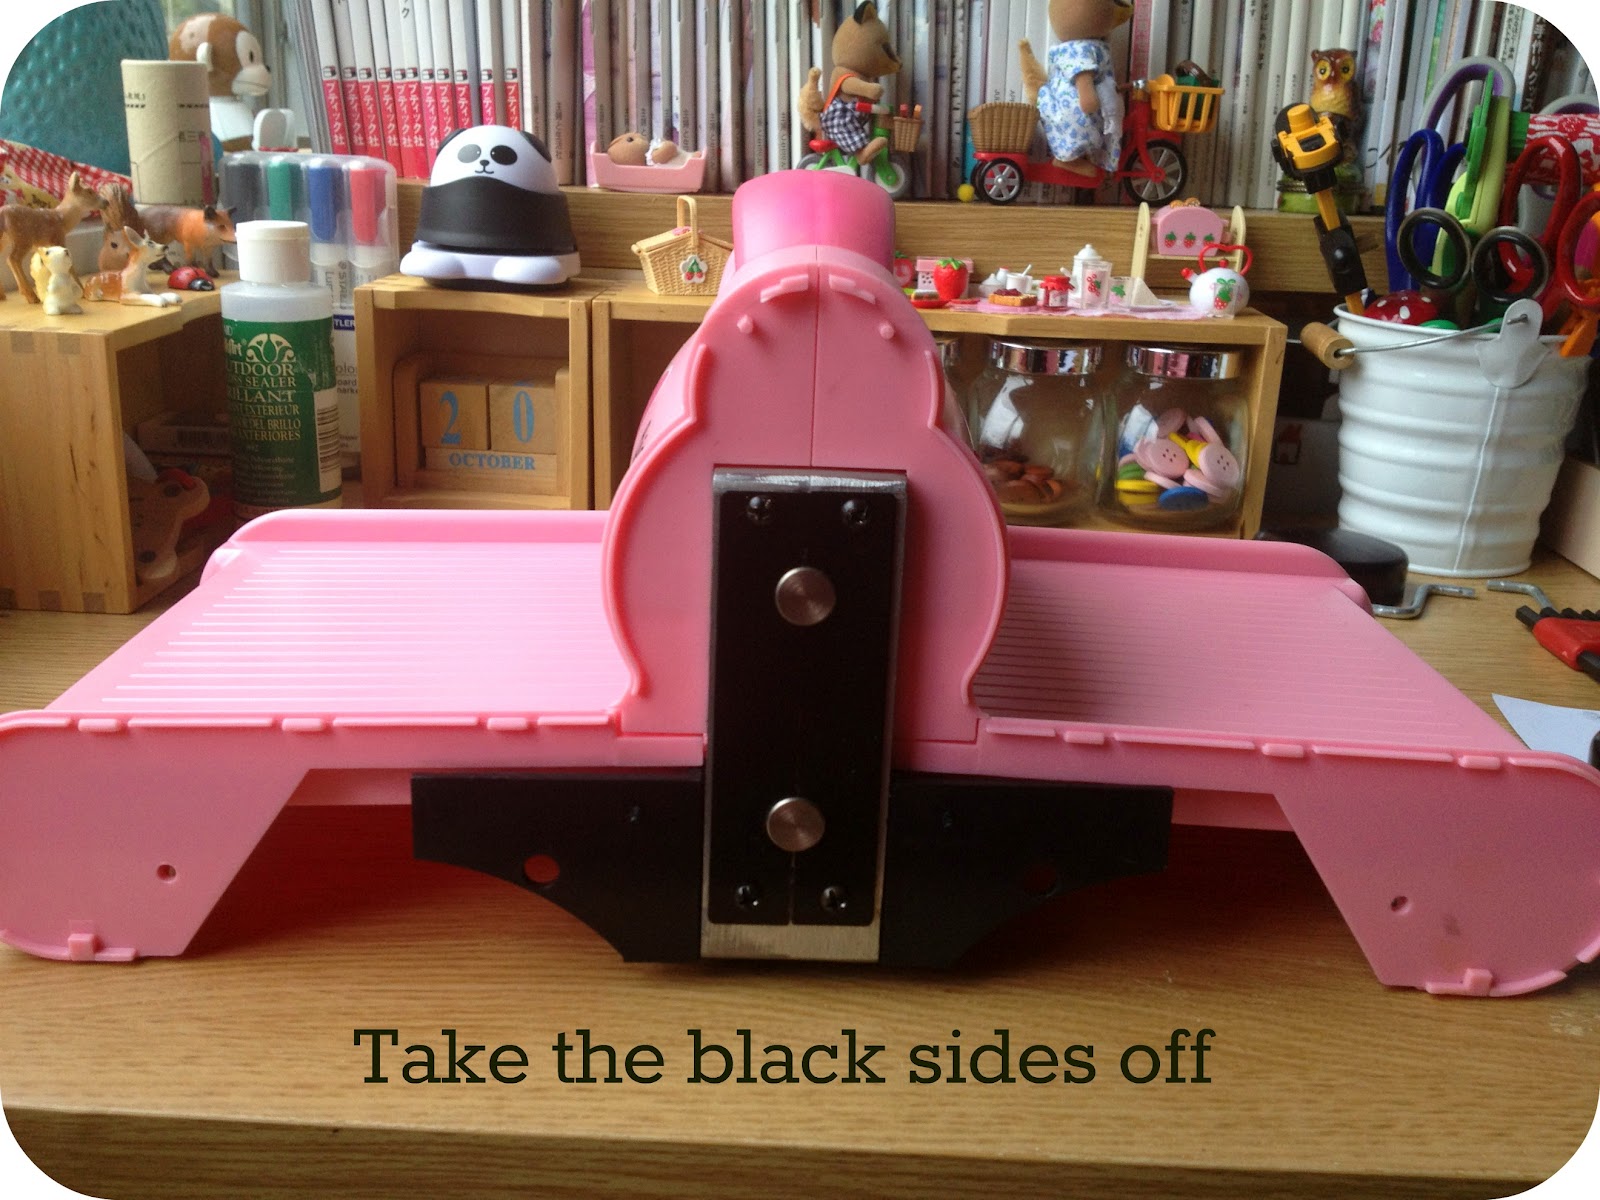
Once all the screw are taken off you will need to use some force to take off the black sides. They are clipped in but with some patience they will come apart.

 Step 5
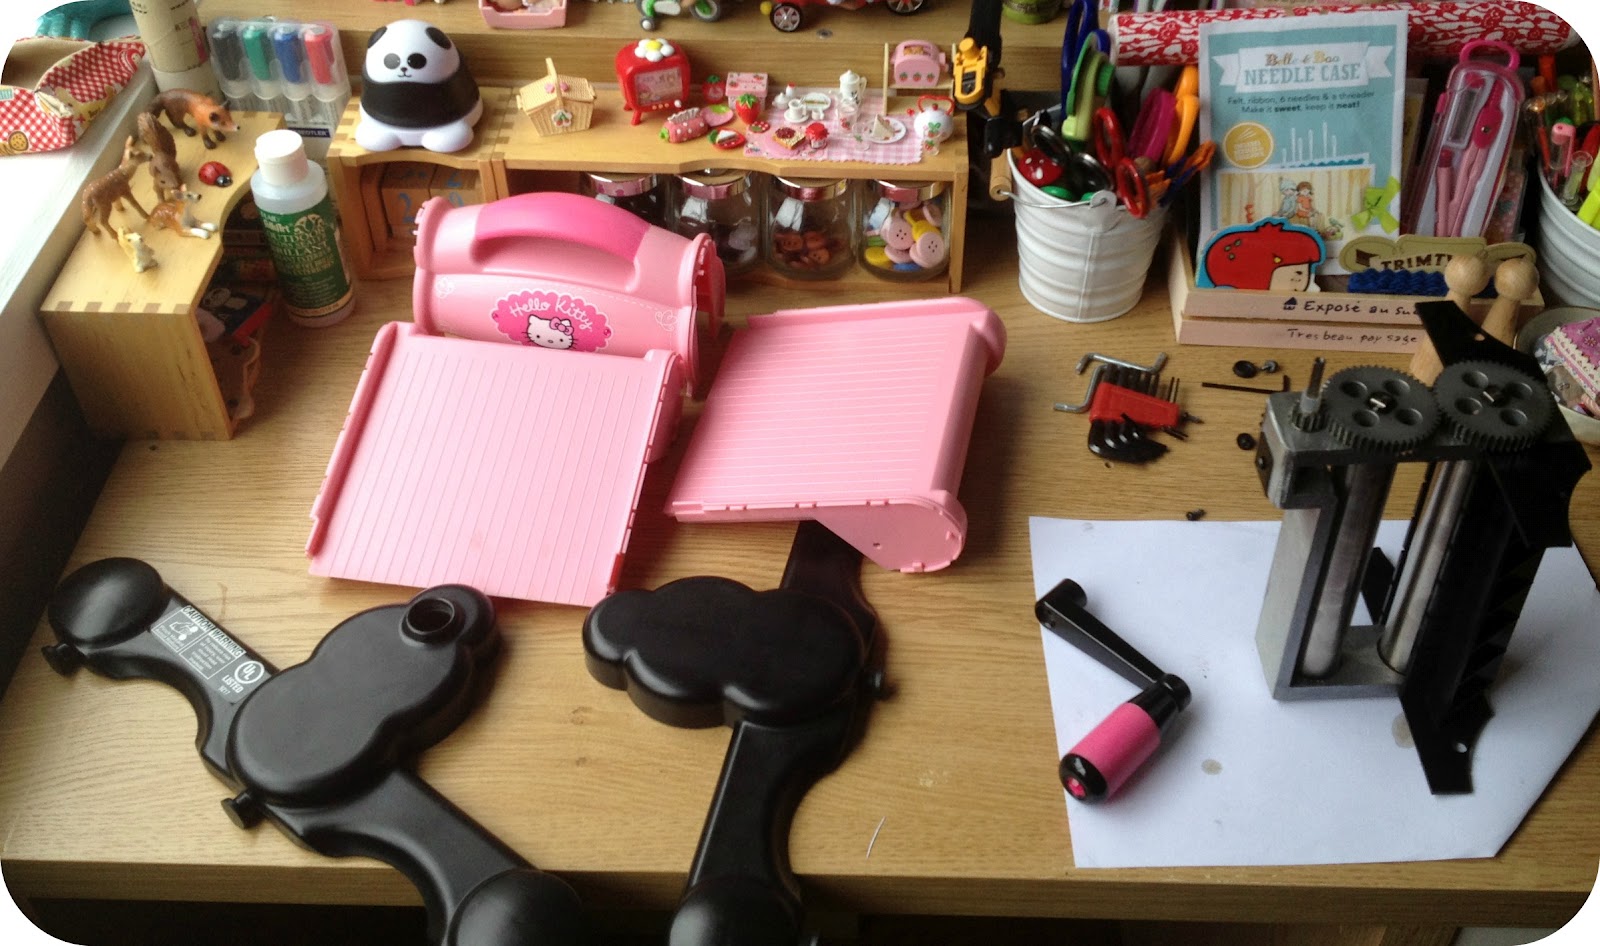
Next is to take off the middle handle and then the plates either side these will come apart easy.
 All the parts should ow be off the main metal rollers.

Step 6
Next is to brush out any fluff in the rollers mine had a bit because it gets a workout with felt...
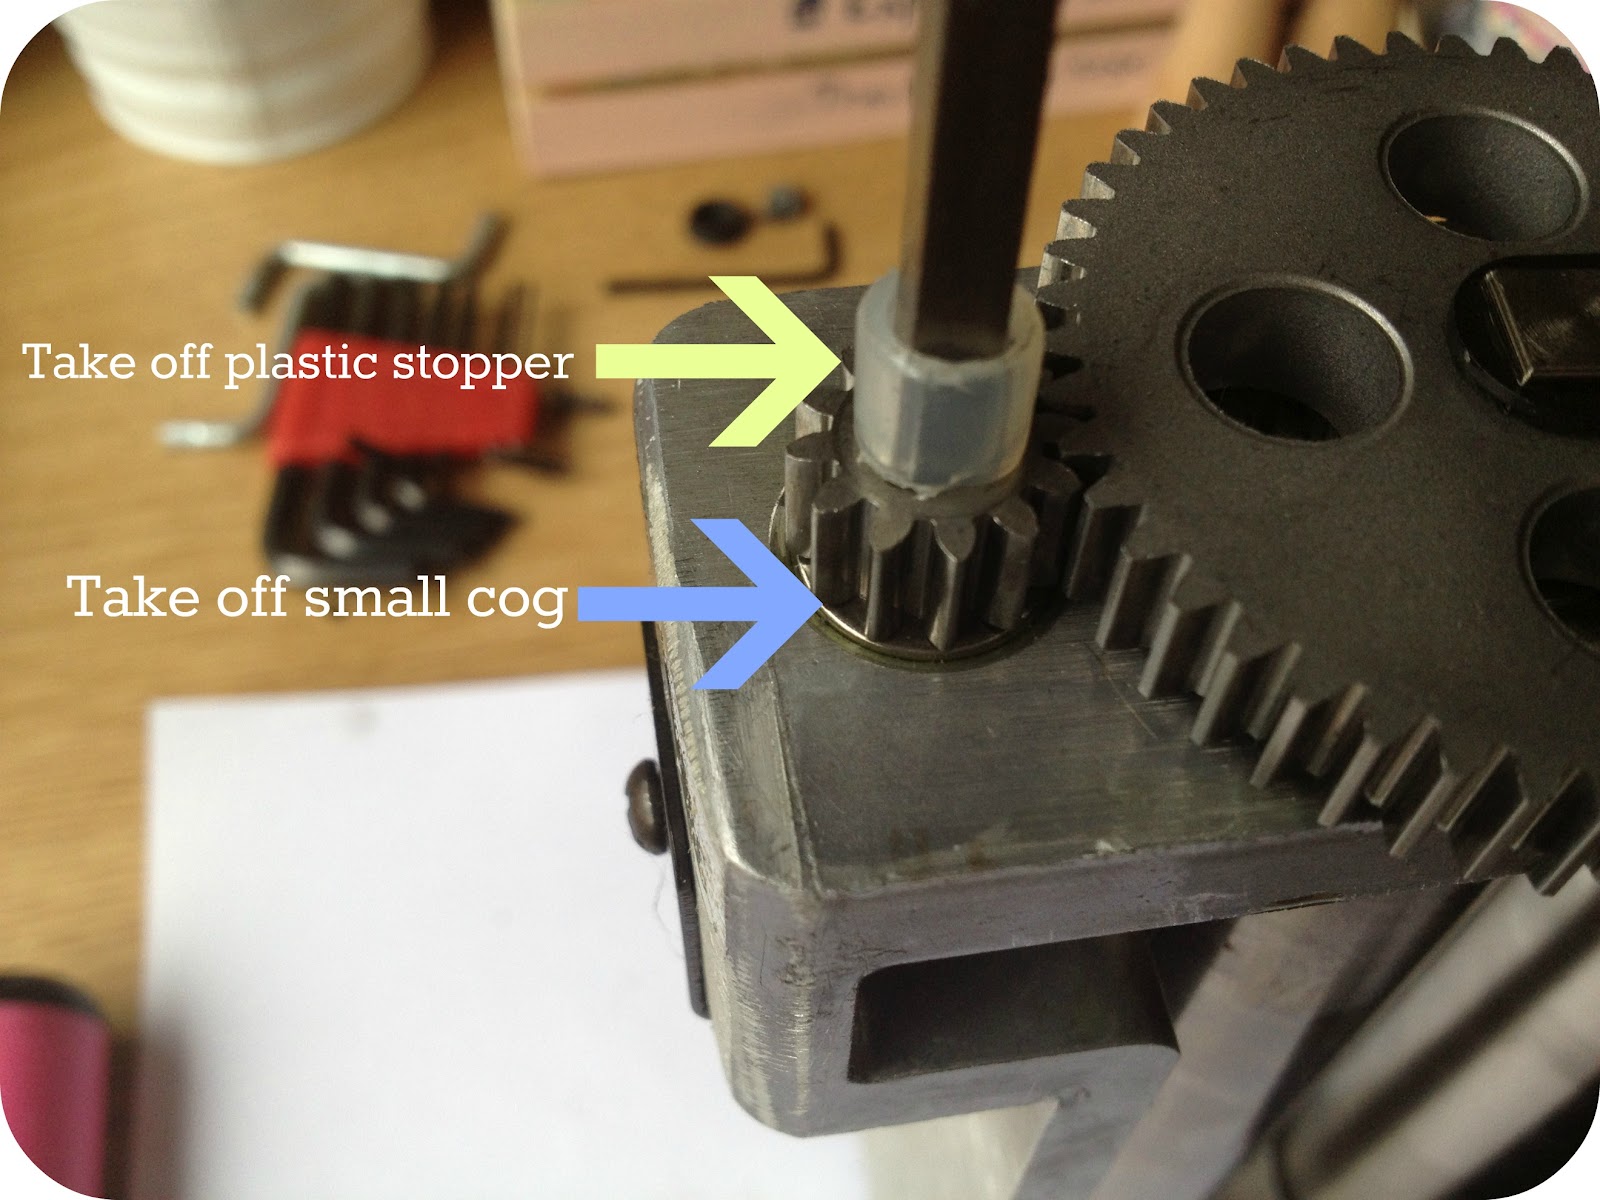
Take off the top small cog by pulling off the plastic stopper and then the cog.
Step 7
Now this is where my skateboarding days come in handy....underneath the cogs there are bearings very similar to the ones used in skateboarding wheels and if the get dirt and dust in them they tend not to move or get stuck. 
So to fix this put some sewing machine oil or any machine oil you have and put it on the bearings.

Step 8
Put the small cog and stopper back on... next slide the cranking handle on and give it a few turns all the cogs should move and this will send the oil into the bearings to lubricate them...After a few turns everything should be moving smoothly

Now to put it all back together
Just go backwards on the way you pulled it apart
Plates on first
Top carrying handle
Clip on sides and screw back in
Put cranking handle on
Use allen key to put back screw for cranking handle
Then place the black cap back

You should now have a fully serviced and function sizzix again
I hope this has helped anyone who has a broken sizzix and need to fix it

Happy crafting!!!!